Nov 22, 2008

Cupcakes are in

Cupcake cards

With all the cupcake themed cards I've seen lately, I decided to make some of my own. I made this card for my friend Valoria for passing her Hewlett-Packard Project Management test. She studied so hard for it, and there were many weeks on end when we couldn't really hang because of her studying/cramming. It took about a year or more of studying to prep for it. I really admire her!
Stamps: Maya Road, Dee Gruenig
Paper: K & Co


This card was for my mom's birthday in October. There were a lot of October birthdays - I still have a few more bday cards from October I haven't shared yet! I made this one to fit into a business sized envelope. All the cupcakes are popped up on dimensionals.
Stamps: Michael's $1 stamp, Scrappy Cat
Paper: Basic Grey & unknown

Nov 14, 2008

Soldier's Angels


I Adopted a Soldier!


I recently joined Soldier's Angels (http://www.soldiersangels.org) a couple months ago.

Soldier's Angels is a support organization for United States service personnel.

From the website: Soldier's Angels is a volunteer-led nonprofit that has over 20 different teams and programs supporting all branches of the U.S. Armed Forces. Through special projects, dedicated teams and individuals supporting the troops, they make a visible difference in the lives of service members and their families.

--I wanted to do this to show my appreciation for our troops. I was especially moved to do it when I heard that there was suicide going on and troop morale was low. I cried so much when I heard that. So now I have been assigned a soldier and I write him encouraging notes/letters once a week, and one small package per month. (that's the requirement, but I'm more than glad to do it).

I just checked the site right now and in the upper right hand corner you can see that there are 6 Heroes waiting to be adopted. I've never seen the number so low, that's good! When I signed up there were 123 Heroes waiting.

So these cards have gone out to my adopted soldier over the past couple months and I just sent him a Thanksgiving package today. I hope he'll get it in time. I believe he's in Iraq, the address is an APO address so I don't exactly know where he is, but it doesn't matter. I just pray that he is safe and warm.


top card
stamps: unknown
paper: SU real red, night of navy, whisper white
inks: SU real red, pacific point
accessories: star punch

bottom card
stamps: SU The Free & The Brave, SU Stars & Swirls (retired), The Angel Company (retired military set)
paper: SU real red, night of navy, confetti white, pacific point
inks: SU real red, pacific point, copic markers

Kreativ Blogger Award - Thank you Juli!


Hey everyone! Doo - do- doo!!!!!! (blowing pretend horn) Julie Smith (http://www.stampinjewels.blogspot.com) has chosen me as a Kreativ Blog Award winner/recipient!!!!!!

I am so honored, I've never received one of these blogs awards before! I've seen a lot of them going around but was never nominated to get one until yesterday. Yippee!!!!

I love making cards and sharing them on my blog. I try to make 1-2 cards every day (but some days I can't). Also, even though I make a lot of cards I don't always have time to photograph them, upload them to my computer and then post them to my blog. The process takes a while!

So I'm very happy to have received this award! THANK YOU JULI!!!!!!!

Now I must choose 5 bloggers to give this award to as well. Stay tuned, I will narrow them down soon. There are just TOO many to choose from!

Weeeeeeeeeeeeeeeeeeeeeeeeeeeeeeeeeeeeeeeeeeeeeeeeeeeeeeeeeeeeeeeee!!!!!!!!!!!!!!

Nov 6, 2008

Alcohol Inks on Metal & a Sample without Blending Solution

I've done a test here to show what the alcohol inks look like without using the Blending Solution:


Here you can see what it looks like on the left. I used the applicator tool with felt and two alcohol ink colors, Denim and Red Pepper, without any Blending Solution. And for the piece on the right I used a few good squirts of Blending Solution on the felt pad before I pounced it onto the paper. If I wanted the colors even more subdued I would have put even more of the Blending Solution on the felt pad. Neat, huh?

ALCOHOL INKS ON METAL:

I found these metal letters at Michael's in the $1 bin a while back and decided to try the alcohol inks on them too:

I put a few drops of Cranberry and Butterscotch alcohol inks on the felt pad with just a teeny bit of Blending Solution. If you're applying the inks to metal you don't need much of the Blending Solution because the metal kind of spreads the ink out on its own. Look how nice it turned out! Below is a clearer photo.

Isn't it purty?

Here's two more. I didn't use any applicator on these because I wanted to experiment a little. I put the inks on directly -- one drop at a time and I did them in 2 layers. I let the first layer dry and then put more drops of ink on again later.

colors used: Stonewashed, Denim & Meadow

colors used: Wild Plum & Eggplant

Alcohol Ink Doggie Card

Here is the finished card I made using the sample piece from the Alcohol Inking Basics on Glossy Paper tutorial I did a couple weeks ago. The bone was hand drawn and cut out and then distressed with sponges.

Stamps: Inkadinkado Dogs, Stampin up Best Yet
Paper: White Glossy by Ranger, Stampin Up Old Olive, Choc Chip, plain white cardstock.
Inks: Ranger Alcohol Inks meadow & ginger, Stampin Up Choc Chip, Close to Cocoa, Real Red, Creamy Caramel
Accessories: gold cord, large brads, cuttlebug houndstooth embossing folder, punches, awl, brayer, sponges.

Oct 29, 2008

SMARTWORKS Rubber stamps, 3 cards

There are still a couple days left to get stamps at 35% off at SmartWorks Rubber Stamp Co y'alls. The sale ends on Oct 31, 2008. They have such a wide variety of images -- vintage, modern, country, all the holidays, florals, 3-step stamping and a lot more.

SALUTATIONS STAMP SET

I got this Smartworks Salutions stamp set a while ago and have been meaning to make a bright and pretty card with it. I found this Basic Grey paper in my stash and thought that pink tulips would look nice together!

I used my brush art markers by Marvy (Dee Gruenig) to color directly on the stamps. I used a few colors of pinks and greens together to get some dimension and shading on the tulips. After marking up the rubber stamp, I huffed on it with my breath to give it a bit more moisture then stamped it. You can use this technique if you want a lot of shading to show up on your stamped image. I then went in and colored the tulips with more light pink. To make it shine I added pink stickles (cotton candy) over some parts. The pink frilly photo corner was made by cutting a paper triangle then cutting the long edge with scalloped scizzors. For the final touch I punched 3 tear drop shapes. I thought I'd make my own fancy corner instead of buying one more die cut. The
3 lines on the botttom pink piece were made with the scoring blade on my paper trimmer since I don't have a Scor-it or Scor-Pal yet.

stamps:
SmartWorks BFL-05 Salutions set (pg 73)
paper: SU kiwi kiss & pink pirouette, white, basic grey
inks: Dee Gruenig brush art markers, SU pretty in pink marker
accessories: ribbon, Martha Steward border punch, SU key tag punch, bling, decorative scizzors, fiskars tear drop punch, paper trimmer with scoring blade, cotton candy stickles


MUG TRIO STAMP SET


I made this card for my dear friend and one-time secret sister Valoria. She was assigned to be my secret sister for one entire year and then we met at the end of the year! Pink is her favorite color and I wanted to thank her for taking me out for my bday last week.

Since this is a 3-step rubber stamp I first did the base of the coffee mug using Stampin' Up's pretty in pink. Then I stamped the 2nd layer with Regal Rose, and then the final 3rd layer was stamped with chocolate chip. The final layer is basically where the shading goes (the shadow of the cup that isn't exposed to light) so it should be the darkest color.
I had to use a stamp positioner to line everything up which is why it turned out so perfectly matched up. Mine is from Stampin' Up.

I used scalloped decorative edged-scizzors to make all the scallops.

stamps:
SmartWorks DK-07 Mug Trio set, coffee beans - unknown stamp
paper: SU pretty in pink, chocolate chip, creamy caramel, whisper white, Kelly Panacci sandylion dp
inks: SU pretty in pink, regal rose, chocolate chip , creamy caramel, hot cocoa pastel sailor pen.
accessories: scallop scizzors, paper trimmer with scoring blade, paper & fabric flowers, half pearl.


BLOOM WITH JOY STAMP SET
The sentiment *May your day bloom with joy* (pg. 25) is also a SmartWorks stamp and comes with 3 little flowers. SmartWorks has tons of sentiments and a very large catalog you can view page by page and download, it's all pdf. I paired this sentiment up with this cute StampingBella *FlowahBella*. (I added more curls to her hair with a permanent black pen.) I used an orange spica glitter pen on her dress and sakura glossy glaze pens on the flowers and pot. The large flowers in the background are from TAC.

stamps:
SmartWorks WD-41 Bloom With Joy, StampingBella, TAC
paper: SU regal rose & wild wasabi
inks: SU regal rose & wild wasabi, handsome hunter, chocolate chip, close to cocoa
accessories: ribbon, spica glitter pens, sakura glaze pens available at CPS

Oct 28, 2008

Another birthday card... this time for Henry!

This time it was my turn to make a birthday card for my nephew Henry who turned 10 last week. His parents have gotten him into rock'n'roll very early and now he loves it. Whether that's good or bad I'm not sure. (Being exposed to some of the lyrics in the songs and the lifestyle of the rockstars, that is). Anyway, he has now started taking electric guitar lessons for some time and his dad takes him to jam sessions with his 2 uncles and they all play together with their drums and basses and electric guitars. So he LOVES his guitar and his rock'n'roll music! I just pray that it's good clean wholesome rock for his 10 year old ears! He has been practicing with some of the other kids at his school and in December they are going to perform a song for the yearly talent show. Kids are growing so fast these days!

stamps: Studio G $1 stamp from Michael's
ink: basic black ink
paper: white, red
accessories: sticker set by Jolee's, wavy paper cutter by Creative Memories.

Oct 25, 2008

Mr. Scarecrow - Markie's Mom Tech!


I finally managed to sit down and attempt to do a card a la markie's mom (link is to her splitcoast gallery).

For those of you who don't know, Faith Hofrichter (http://stampinwithmarkiesmom.blogspot.com/) also known as *markie's mom* on splitcoaststampers has a special way of putting dots on the borders of all her cards and elements. After months and months of looking at her lovely cards and chatting about them with my stamping friends, I finally decided to make a card using her *dots* style - and I have to tell you, it's really fun! The only thing I would change about this card is that I should have put dots where I put fake stitch marks around the scarecrow.

The stamp set is from Smartworks, they are currently having a 35% off sale on all stamps for the entire month of October.

stamps: Smartworks Scarecrow set
paper: SU burgundy, whisper white, Frances Meyer *Autumn Wheat* designer paper
ink: black stazon, copic markers, SU markers, hot cocoa Sailor paint pen
accessories: paper flowers, half pearls, coluzzle oval, SU key tag punch, dimensional pop-ups

Frankie Improved!

So here he is, the new improved Frankie!


This time I left out the googlie eyes and added two neck screws. I also used the Stampin Up tab punch for the nose and cut his hair by hand. I also used Stampin' Up's Garden Green paper instead of Kiwi Kiss. I hope you like it!

Oct 23, 2008

Frankie Halloween Box


OK, I think my Frankenstein box/treat bag turned out kind of wierd. He does not look at all like the ones I cased on splitcoast! Funny! I think he looks wierd because I used googlie eyes instead of punches and I shaded the eyelids and nose too much. His hair looks wierd too. Anyhows, it was my first one, so I should be excused!

Here are links to some really great ones: Click here. And here for different ones.

And here is a video tutorial by Angie Kennedy Juda, on her blog: CLICK HERE

(All the items I used are the same as found on Angie's video.)

paper: Kiwi kiss, black, white
Access: wire, hole punch, black marker, sticky strip, googlie eyes, pop-ups.

Oct 22, 2008

Alcohol Inking Basics on Glossy Paper

Alcohol Inking Basics on Glossy Paper

In order to get really good results with the alcohol inks, I recommend you use the tools that Tim Holtz designed to use with them. Pictured here is the Inking Tool and a pack of Applicator Felt pieces (mini pads).

You will also need glossy paper for artists/crafters. Creative Play Stamps carries the paper by Ranger and the tools/inks as well. --You can't use glossy photo paper, btw - it doesn't work. And finally I highly recommend that you also use Blending Solution, although you don't have to. It just helps spread the ink out instead of leaving pure color blobs. It spreads the color out and blends them -- allowing them to meld together in a natural way.

The inking tool has a wood base and medium sized handle -just the right size to fit it your palm. On the bottom of the base is a strip of velcro that's permanently attached, so you can easily put on and/or take off your felt pad.

Simply place the piece of felt onto the the velcro.

It stays put with just the right amount of clinging. It won't fall off while you're using it, but it's easy to take off as well.


Next, choose your color of ink and gently squeeze. It's very easy to control the amount of ink that comes out - the bottle is designed with the artist in mind, and the needle-nose tip makes it even easier to control the flow of ink. I used the color *Meadow* in this example.

Lift up and repeat it again. Place around 4-7 drops on the pad, depending on how large of an area you need to cover.

Now add a few drops of Blending Solution on top of the color drops. (Using the Blending solution is optional, however if you don't use it all you'll get when you apply it to your project is exactly what you see on the felt pad - little drops of color - there will not be any spreading/blending going on.)

You can see how the color drops and Blending Solution have melded together on the pad.

Now pounce it onto the glossy paper.

Keep repeating until you have good coverage.

You can add another color if you want -- simply add a few drop to the felt. You don't need to use a new piece. I used *Ginger* for the 2nd color.

Just pounce away again.

And Voila! Now you have a wonderful new piece of paper! If you want to add another color, just repeat the step above. Add metallic mixatives to spice it up and give it a little tinge of metal!


Here is a LINK to a massive library of sample cards made using this technique. (From splitcoaststampers).

A SIDE NOTE *** I did the color in 2 steps, however you can do it in one step -- just put different color drops on the felt at the same time (however many you like, really) and then add the Blending solution and pounce away. The result will be similar.


There have been other methods for laying down the color, some people only pounce the blending solution onto the paper after the inks have been applied, and there are still yet other ways to do it.

Remember, the inks can be used on plastic, metal, glass, and other slick surfaces. The inks were not meant to be used on absorbant papers!

I will have a couple more examples in October. Stay tuned!!!

Sep 30, 2008

Tim Holtz Adirondack Alcohol Inks

Tim Holtz Adirondack Alcohol Inks

available at Creative Play Stamps

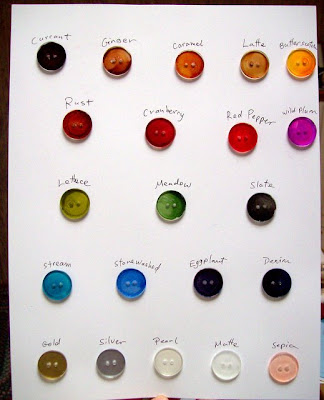
Adirondack Color Chart:
I've been playing around with and experimenting with Tim Holtz's Alcohol Inks and finding that the possibilities of what you can do with them is just endless! There are a total of 24 colors available, and an extra 4 bottles of metallic colors, called *Metallic Mixatives*. There is also a Blending Solution and various applicator tools available. These inks are made for applying to non-porous materials like glass, plastic and metal.

YOU CAN SEE A VIDEO TUTORIAL HERE, at Creative Play Stamps.

Description: Ranger Adirondack Alcohol ink is acid-free, fast drying, and transparent. These Earthtone dye inks are specially formulated to create a colorful, polished stone effect. Use on glossy paper, dominoes, metal, shrink plastic, glass, and other slick surfaces.

  • Acid free
  • Fade Resistant Dye Inks
  • Multi-Surface
  • Half Ounce Bottles
  • Precision Tips
  • Color coordinates with other Adirondack products

So, when I started to work with them I couldn't see the ink's true colors just by looking at the bottle so I decided to make a color chart for myself. I used clear plastic buttons from 7 Gypsies and dabbled a little of each color onto each button. (I don't have all 24 colors). You can click on the chart and it will enlarge. On the bottom row, the last 2 buttons on the right are coated with rangers Inksensstials Accents, *Matte* and *Sepia* which when applied will create either a non-shiny matte look (matte), or an antique brownish-pinkish hue (sepia).

All the supplies can be bought at Creative Play Stamps (www.creativeplaystamps.com)

I will post more tests, findings and experiments over the next couple weeks so be sure to check back!

Jul 9, 2008

Tiptoe through the Tulips!

Tulip time!!!
Don't you just love tulips?

I love this stamp image by Creative Play Stamps, it is simple and pretty and just the right size for making a big impression on your card. *Three Tulips* can be found here. I love that you can color the stamp with markers prior to stamping (as opposed to using a stamp pad). For these cards I decided to color directly on the stamps themselves with water-based markers, give them a good *huff* with my breath and them stamp them on smooth white paper. (**note: alcohol-based/permanent markers will not work with this method because they dry too fast).

I used Marvy Art Brush Markers because they are specifically designed to be used with rubber stamps in this way. They are juicy, sturdy, do not fray (even after multiple uses) and give a very clean image.

For this card I colored the tulips with Red #2 and then went over the shaded parts with English Red #28. It's easy to see the shaded parts on the stamp because they have a cross-hatch pattern, whereas the highlighted parts are solid. I then colored in the stems with Green #4 and then huffed and puffed on the stamp to moisten it. The stamped image turned out really crisp and clear. :) Afterwards I added *Eucalyptus* Stickles to the stems and *Christmas Red Stickles* to the shaded parts of the tulip. The round stickers are by *7 Gypsies* and the punches are by Fiskars. Papers by K & Co and Stampin' Up cardstock. All of these accessories can be found at Creative Play Stamps.


Here is a little darker version below, I did the same with the coloring except I used English Red #28 for the base with *Star Dust* Stickles on top of it, and then Black Cherry # 108 for shading and *Magenta* Stickles on top of that. I pulled out my new Martha Stewart flower punch and popped those up on dimensionals. The yellow and orange centers were made by punching out a little piece of cardstock and gluing them to the back.

You can't really see it, but since my little journaling frame by K & Co is not white but sort of cream colored, I sprayed the tulip piece with a little bit of ink to match. It was stark white so I wanted to tone it down a bit.
Here's how I did it --I made my own mini spray bottle using the Ranger *Mini Mister*. I simply filled it with tap water, then added about 5 drops of *Brushed Corduroy* reinker by Ranger and about a quarter teaspoon of *Perfect Gold* glimmer powder by Ranger's *Perfect Pearls*. You shake it up and spray away! The perfect pearls powder makes it sparkle just a bit, it's just great! I learned this technique by Jeanne Streiff at a local rubber stamping show in California in February.

-I was very happy that the sentiment *Hello* fit perfectly on the frame -- it's from the stamp set *Thinking of You* also by Creative Play Stamps, it comes in a sheet with 20 different sentiments and greetings such as: hi, best wishes, miss you, thinking of you, hello, just a note, etc... it's a great deal, you get so many on one sheet!

Lastly, I drew the stitching around the sentiment with a brown pen, and wrote the word *tulips* by hand. Papers by K & Co and Stampin' Up cardstock. I hope you enjoy looking at it!


For my third try I decided to go yellow/saffron colors. It was also a good opportunity to use my *Butterscotch* Adirondack color wash spray by Ranger!

So I chose Marvy Brush Art Markers Citrus Yellow #69 and Orange #7 for the tulips, with *Orange Peel* Stickles. I then took it outside and sprayed the entire piece very lightly with *Butterscotch* Adirondack color wash spray. Afterwards, I sprayed some more onto a piece of saran wrap so there was a tiny puddle and then edged it in the ink. I wanted all of these lovely shades of yellows and oranges to stand out and look artistic so I chose to do it in the popular *distressed* style. I like it when I can get a little messy and artistic!

Since I had my K & Co frames already out I decided to use this very pretty yellow one which turned out to fit perfectly across the card. The *Just a Note* sentiment seemed like an excellent match so I used that and hand drew the musical notes. It was stamped using *Aged Mahogony* Distess Ink pad. This sentiment can also be found in the stamp set *Thinking of You*. All those little dots on the edges are hand-doodled. I also decided to edge this piece with the Butterscotch spray as well. You can see it on the edges a bit. Papers by K & Co and Stampin' Up cardstock.

May 7, 2008

Chigiri-e Birdies RAK


I received this beautiful Chigiri-e card from Marg O, a member of *Oriental Stamp Art* a couple days ago! Marg was in a chigiri-e swap and I was so fortunate to receive this extra card. There are a few other amazing stamping techniques used on this card, it's so COOL. The branches have been heat embossed and colored in with metallic ink and the birds' claws, beaks and eyes have been drawn with 3-D paint. The trees in the bg are metallic gold and the moon shimmers and is pearly. The entire card has been edged with gold too, it's just so pretty! And then there's the birds themselves - I've never done chigiri-e before, but it's little pieces of paper that are torn and glued together into shapes to form a picture, it's very delicate and pretty, you have to see it in real life. Thank you Marg!

May 6, 2008

We have a winner, it's comment #10, Paper Makeup!!!

HI ladies!!!

We have a winner this morning, it's comment #10, Paper Makeup aka Katie Shawger!! Congratulations Katie!!!! I'll email you in just a sec -- since I know you from the bellaholics yahoo group I have your email address already!

Thanks everyone for playing, this was so much fun, I think I'll have another blog giveaway later this month so stay tuned!!!

--I also had tons of fun with playing with the random number picker. I went to a few different sites but most of them were too complicated and scientific -- I finally came across one called *The Random Number Picker* - it's fun and simple, give it a try! You just enter the total number of players in the box and hit the *enter* key on your keyboard!

http://users.csc.calpoly.edu/~jdalbey/Public/SpinWheel.html

May 4, 2008

Humongous Bella Rak!!!

Look at the rak I got from my friend Bere Rabago, Mexico's next most famous designer pastry chef of all time! I got a stamped image of almost every single Bella, plus some Fellas and other Stamping Bella images. All I could do was just stare at first and then I stacked them up and flipped thru them over and over again, and then I finally put them in huge photo album in alphabetical order, lol!!! How's that for rubber stamping dorkiness? Bere also sent me a Bubu Lubu candy bar, oh yummy!

Stamped images of almost ALL the Stamping Bella images, some Fella images and a few other Bella images! I'm afraid to use them!

Bubu Lubu candy bar - marshmellow, chocolate and fruit filling! Yummmmmmmmmmmm!

My friend Bere is a designer pastry chef in Mexico City, Mexico and makes beautiful cakes. Here is photo I snagged from her website *Cup a Cake*. Isn't this beautiful?


Bere is also an avid rubber stamper and is so generous with sharing her talent and supplies. We share a passion for *Stamping Bella* images and met on the *Bellaholicsanonymous* Yahoo Group, lol!!!!

May 3, 2008

Blog Candy PIF (Pay it Forward!)


Ok everyone, I'm doing my first ever blog candy giveaway!!! It's actually a PIF (Pay it Forward) giveaway, promised after entering Shawn Price's blog candy giveaway to keep the PIF chain going. So, whoever wins this must keep the PIF going by having a little blog giveaway on their blog! This chain hasn't been broken yet - I don't know where it started but it's been going for a while, so please don't break it.

The winner will receive a handmade card using *Dogwalkabella* from Stamping Bella, 4 rolls of JoAnn's ribbon, a sheet of sparkle gel stickers by Cloud 9 and a box of Mini Charleston Chews! I will also throw in a few stamped images of *chefabella* and *javabellas*.

Please leave a comment by Monday, May 5th midnite PST and I'll use the random # generator site to pick the winner on Tuesday morning! Important: Since I'm new to this and am not sure how to contact the winner, could everyone please leave their email along with their comment in a form like this (so you won't get junk mail): kelly746 at yahoo dot com. I will also announce the winner here if you want to check back. Good luck everyone!

Apr 23, 2008

My Very First Bella Card


Here is my first ever Bella card! This stamp is called *DogWalkaBella*. I have a mini dachshund named Jakey that looks just like the little guy on the far end. I have been eyeing the Stamping Bellas for such a long time and finally took the plunge and bought a few! I also bought Javabellas, Chefabella and Veggiebella. They are so versatile because you can color them in for any season, shade or emotion. I used Stampin' Up markers, Tombow and Copic markers and Stampin' Up oval punches. Paper by Canson and Basic Grey.

Chef Cards


I got these images in an image swap about 2 years ago but forgot about them. I was cleaning up my stamp room about a month ago and found these. I made these cards for my sister who cooks non-stop and is always giving food away. She doesn't use recipes ever, everything is already stored away in her brain from years of cooking. I'm the total opposite. I need the recipe in front of me with all the ingredients laid out in the correct measurements or I can't make the dish!

I used a silver glitter pen to color in the serving tray - you can't really see how much it shines in this photo. On the top card the cheese and wine is popped up on dimensionals. The Miss Piggy quote is from a 7 gypsies cooking sticker sheet.
Posted by Picasa

Quickie Card

I made this using the double-stitched ribbon and stickers from last year's tin.. I put glitter on those really large glue dots and used them as the centers for the flowers.
Posted by Picasa

Mar 19, 2008

*Party Hearty* Set - Sneak Preview from Oakland Regional

Here is a sneak preview of one of the Fall 2008 sets called *Party Hearty*: